Changing the Oil on a Honda CB125
The interval that the oil is changed will have a direct effect on the lifespan and performance of any internal combustion engine regardless of what fuel it uses, be it diesel, LPG, gasoline or whatever. Over time the oil will become contaminated by moisture, dust and metal particles from the engine itself as it wears. The additive package that is part of the oils formula will eventually breakdown and become ineffective, becoming little more than a contaminant itself. Under these circumstances the oils ability to lubricate will be compromised and the engine will perform less efficiently and eventually fail. Changing the engine oil regularly is the only sure way to make sure that it is effectively lubricated.
 Honda recommends that the oil is changed after the motorcycle has travelled its first 1000km or 600 miles. After this first oil change an interval of 4000km or 2500 miles is recommended. Honda's recommended oil change interval is a reasonable one in my opinion however I personally change the oil on my CB every 2500km for three reasons. Firstly changing the oil more regularly certainly will not harm the engine but does ensure that it is getting maximum protection. Secondly, I do rev the daylights out of my CB125 and this shortens the lifespan of the oil. Finally, I do my own oil changes which is significantly cheaper than paying a mechanic to do it so I consider it to be cheap insurance for the lifespan of the motor. Honda states that an oil with an API classification of SG or higher is required but not one that is labelled as energy conserving as these contain graphite or molybdenum additives that will affect the operation of the clutch. The JASO T 903 equivelent is MA. There are two suggested viscosities that may be used, it is suggested that in areas where the average temperature is less than 15°C (60°F) 10w-30 grade oil is used. In temperatures higher than that 10w-40 may be preferred. The oil required for an oil change is about 800mls (27oz). If the motor has been disassembled it will need about 1000mls (1 litre or 33oz's). These figures are provided to let you know how much oil to buy in preparation, let the dipstick be your guide as to how much oil to add.
 Changing the oil on a Honda CB125E is an easy task for a mechanically minded person and can be performed with a little practice in about 15 minutes or so. It is simply a case of draining the old oil out through the drain plug (sometimes called a drain bolt) located in the bottom of the engine and filling it again with the correct amount of fresh oil via the dipstick hole on the right hand side of the crankcase. If you are not mechanically minded it would be wise to find someone who is to help you for a few times to make sure you get the hang of it. Dont take the risk of damaging your motorcycle if you are unsure of what you are doing.
Like all mechanical procedures it is wise to start with a motorbike that is clean and dry as this will reduce the risk of dirt getting into the motor and shortening its life. If a few grains of sand get in between the piston and the cylinder wall for example it will score them both and cause them to wear out. As the oil drain plug is located on the bottom of the engine dont skimp on cleaning it, great big clumps of dried mud will stop you from finding the drain plug let alone taking it out. I find it a good practice to give the bike a good wash, let it drip dry a bit and then take it for a 10 or 15 minute ride to dry it off. Going for a short ride helps on the next step anyway.
Warm oil will drain faster and more completely than cold oil so run the engine for a few minutes to heat it up. It goes without saying that this should be done outside so you dont poison yourself with carbon monoxide before moving your Honda into the workshop area and putting it onto its centre stand. Putting the bike on its centre stand will make it more stable and will ensure that the oil drains completely from the engine. Place an oil drain pan under the bike so that you are not draining 800mls of oil straight onto the ground. We will of course dispose of the used oil in an environmentally safe fashion later, right?
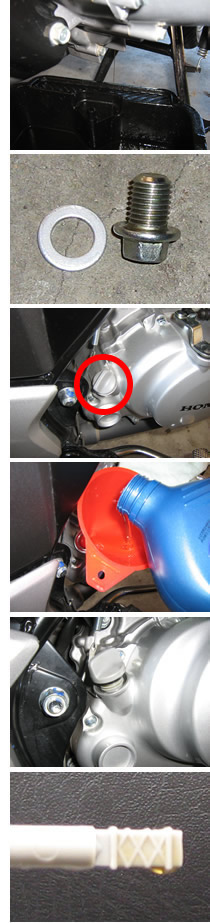
From this step onwards, make sure the motorcycle is not running and cannot be started. Running an engine without oil or with too little oil may cause serious engine damage. Remove the key from the ignition of the motorcycle to be certain. The drain plug is located on the bottom of the crankcase, if you are not sure where take a look at the large photo on this page where someone has thoughtfully put a red circle around it. The image is taken from the left hand side of the motorbike. Loosen and remove the drain plug as you would any other bolt and allow the oil to drain into the oil pan. Dont burn your fingers on the hot oil. While the oil is draining inspect the drain plug to ensure it is not damaged in anyway. The sealing washer should also be inspected to ensure it is in good condition. Honda recommends replacing the sealing washer on every second oil change or whenever it appears to be damaged, scored or compressed.
Once the oil has completely drained from the engine (there will always be an occasional drip, dont be too concerned about getting every last drop) reinstall the drain plug and sealing washer. It is a good idea to use a torque wrench to tighten them to the recommended 22 lbf-ft (30 N-m or 3.0kgf-m). Nip it up until it is firm (not hard!) if you do not have a torque wrench. Do not overtighten the drain plug or the thread in the crankcase may be damaged. Do not undertighten it or it will fall out while you are riding. Both of these scenarions can have expensive outcomes.
Now that the old oil has been removed from the engine it is time to add the fresh stuff! The combined dipstick/filler is located on the right hand side of the crankcase (circled on the side image), remove it and pour about 700mls of oil into the dipstick hole. A funnel is very very useful for this procedure. Check the engine oil level by placing the dipstick back into the hole but do not screw it in. Make sure that it sits squarely on the thread as pictured. On the end of the dipstick there is a flat section that has two marks on it joined by zig zag lines. The lines are the upper and lower level marks. Ideally the oil should be on the upper level mark (closest to the round part of the dipstick) and should never be below the lower level mark. Add more oil a little bit at a time until the oil level is at the upper level mark. Wipe the dipstick with a clean lint free cloth or rag each time you check the oil level to make sure you get an accurate reading. The motorcycle should be on level ground on the centre stand, once again necessary to get an accurate reading. Do not overfill the engine with oil, if you do overfill it remove the excess oil through the drain plug. Once the oil level is at the upper level mark or at least above the lower level mark screw the dipstick into the scrankcase and start the engine, allowing it to run for two or three minutes.
After running the engine for two or three minutes switch it off and allow it to sit for a couple of minutes before checking the oil once more as described above. Top it up if necessary. Your oil change is now complete.
Honda recommends that the oil is changed after the motorcycle has travelled its first 1000km or 600 miles. After this first oil change an interval of 4000km or 2500 miles is recommended. Honda's recommended oil change interval is a reasonable one in my opinion however I personally change the oil on my CB every 2500km for three reasons. Firstly changing the oil more regularly certainly will not harm the engine but does ensure that it is getting maximum protection. Secondly, I do rev the daylights out of my CB125 and this shortens the lifespan of the oil. Finally, I do my own oil changes which is significantly cheaper than paying a mechanic to do it so I consider it to be cheap insurance for the lifespan of the motor. Honda states that an oil with an API classification of SG or higher is required but not one that is labelled as energy conserving as these contain graphite or molybdenum additives that will affect the operation of the clutch. The JASO T 903 equivelent is MA. There are two suggested viscosities that may be used, it is suggested that in areas where the average temperature is less than 15°C (60°F) 10w-30 grade oil is used. In temperatures higher than that 10w-40 may be preferred. The oil required for an oil change is about 800mls (27oz). If the motor has been disassembled it will need about 1000mls (1 litre or 33oz's). These figures are provided to let you know how much oil to buy in preparation, let the dipstick be your guide as to how much oil to add.
Changing the oil on a Honda CB125E is an easy task for a mechanically minded person and can be performed with a little practice in about 15 minutes or so. It is simply a case of draining the old oil out through the drain plug (sometimes called a drain bolt) located in the bottom of the engine and filling it again with the correct amount of fresh oil via the dipstick hole on the right hand side of the crankcase. If you are not mechanically minded it would be wise to find someone who is to help you for a few times to make sure you get the hang of it. Dont take the risk of damaging your motorcycle if you are unsure of what you are doing.
Like all mechanical procedures it is wise to start with a motorbike that is clean and dry as this will reduce the risk of dirt getting into the motor and shortening its life. If a few grains of sand get in between the piston and the cylinder wall for example it will score them both and cause them to wear out. As the oil drain plug is located on the bottom of the engine dont skimp on cleaning it, great big clumps of dried mud will stop you from finding the drain plug let alone taking it out. I find it a good practice to give the bike a good wash, let it drip dry a bit and then take it for a 10 or 15 minute ride to dry it off. Going for a short ride helps on the next step anyway.
Warm oil will drain faster and more completely than cold oil so run the engine for a few minutes to heat it up. It goes without saying that this should be done outside so you dont poison yourself with carbon monoxide before moving your Honda into the workshop area and putting it onto its centre stand. Putting the bike on its centre stand will make it more stable and will ensure that the oil drains completely from the engine. Place an oil drain pan under the bike so that you are not draining 800mls of oil straight onto the ground. We will of course dispose of the used oil in an environmentally safe fashion later, right?
From this step onwards, make sure the motorcycle is not running and cannot be started. Running an engine without oil or with too little oil may cause serious engine damage. Remove the key from the ignition of the motorcycle to be certain. The drain plug is located on the bottom of the crankcase, if you are not sure where take a look at the large photo on this page where someone has thoughtfully put a red circle around it. The image is taken from the left hand side of the motorbike. Loosen and remove the drain plug as you would any other bolt and allow the oil to drain into the oil pan. Dont burn your fingers on the hot oil. While the oil is draining inspect the drain plug to ensure it is not damaged in anyway. The sealing washer should also be inspected to ensure it is in good condition. Honda recommends replacing the sealing washer on every second oil change or whenever it appears to be damaged, scored or compressed.
Once the oil has completely drained from the engine (there will always be an occasional drip, dont be too concerned about getting every last drop) reinstall the drain plug and sealing washer. It is a good idea to use a torque wrench to tighten them to the recommended 22 lbf-ft (30 N-m or 3.0kgf-m). Nip it up until it is firm (not hard!) if you do not have a torque wrench. Do not overtighten the drain plug or the thread in the crankcase may be damaged. Do not undertighten it or it will fall out while you are riding. Both of these scenarions can have expensive outcomes.
Now that the old oil has been removed from the engine it is time to add the fresh stuff! The combined dipstick/filler is located on the right hand side of the crankcase (circled on the side image), remove it and pour about 700mls of oil into the dipstick hole. A funnel is very very useful for this procedure. Check the engine oil level by placing the dipstick back into the hole but do not screw it in. Make sure that it sits squarely on the thread as pictured. On the end of the dipstick there is a flat section that has two marks on it joined by zig zag lines. The lines are the upper and lower level marks. Ideally the oil should be on the upper level mark (closest to the round part of the dipstick) and should never be below the lower level mark. Add more oil a little bit at a time until the oil level is at the upper level mark. Wipe the dipstick with a clean lint free cloth or rag each time you check the oil level to make sure you get an accurate reading. The motorcycle should be on level ground on the centre stand, once again necessary to get an accurate reading. Do not overfill the engine with oil, if you do overfill it remove the excess oil through the drain plug. Once the oil level is at the upper level mark or at least above the lower level mark screw the dipstick into the scrankcase and start the engine, allowing it to run for two or three minutes.
After running the engine for two or three minutes switch it off and allow it to sit for a couple of minutes before checking the oil once more as described above. Top it up if necessary. Your oil change is now complete.